


")


")
Led by Post-doctoral Researcher Sanandiya Nareshkumar (EPD) and Asst. Professor Javier Gomez Fernandez (EPD), we are a team of 4 SUTD-ians undertaking an UROP (Undergraduate Research Opportunity Program) experimenting with biological alternatives to plastic, or more specifically, chitosan – the outer surfaces of shellfish.
For the past month or so, we have been trying to understand and to a certain level replicate the professors’ already well-researched area of chitosan and its properties. We had managed to create some cup-shaped chitosan samples and recently have also started developing prototypes of straws.
If you have not heard about the recent hype about plastic straws… well then, you must live in a well. Plastic has, as of lately, gained much attention in the media, and given the devastating state of our present environment, is undoubtedly justified. Motivated to play a greater role in the green movement, our UROP team decided to build upon the Professors’ existing research on chitosan by exploring methods of commercializing products made of this biological alternative to plastic. Since drinkware seemed simple enough to work with as a starting point, we embarked on our mission to perfect the art of making chitosan cups and straws.
As you may have already heard, the professors had created cups before, and we were to emulate their process. However, before any shape or form is produced, there is a standard sequence as to how to make chitosan. This is a step-by-step procedure of how it goes:
1. Put on appropriate lab wear and prepare your needed materials. This includes chitin (granulated form), distilled water, acetic acid, a glass rod and a beaker or container. The equipment you would need are a weighing scale and a laboratory temperature and humidity cabinet.
2. Depending on what type of chitosan you prefer, let’s say 2% for instance, mix a weight ratio of 2:100 of chitin granules to distilled water. Use a beaker to pour the distilled water so you know how much (in litres) of water you added. Mix with the glass rod constantly and thoroughly until you achieve a thickened gel-like substance.
3. Depending on how much water was added in the previous step, say 1980ml, calculate what 1% of this volume is and add this calculated amount of acetic acid, which in the example would be 20ml, into the mixture. Mix constantly and thoroughly.
4. Store the substance in the laboratory cabinet. The cabinet should be kept constant at between 50 to 60 degrees celsius. Leave the mixture to settle for a few hours, or even days.
After following the above basic steps of creating chitosan, you would then need to pour your chitosan into a mould to produce your desired shape. Depending on your mould and on how thick of a product you want, you may have to do multiple layers of the product over your mould, and this has to be done repeatedly for many times over a few hours, or even days, until the desired thickness is achieved.
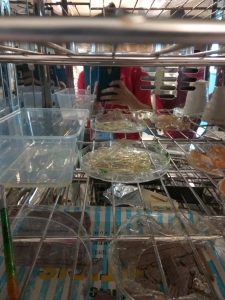
For our team, we poured the chitosan over a plastic cup as our mould and did this several times. We managed to achieve a very thin cup and also experimented with adding dyes to make the cups look more coloured, lively and interesting. The following are some images of our efforts:
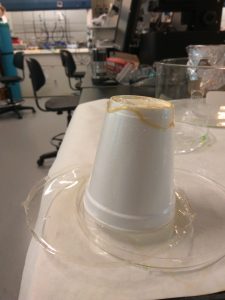
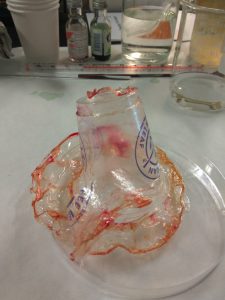
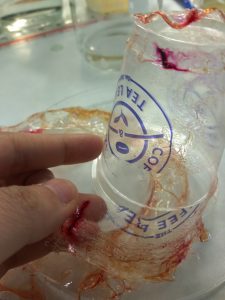
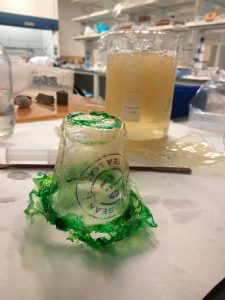
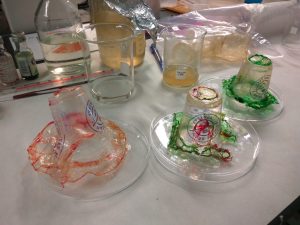
Images of processes of creating chitosan cups
We plan on working on the thickness of the cup. Also, we encountered another issue – the chitosan would break down upon prolonged contact with water. How was a cup supposed to fulfill its function if it would slowly “melt”?! In order to make the cups hydrophobic, we followed-up with a procedure of adding sodium hydroxide, which was a strong base, that would neutralize the acidic bonds and render the chitosan resistant to water.
The above neutralization procedure was actually first applied to our straw products. We had also created straw prototypes that were basically rolled up sheets of chitosan. Some of these sheets might even have been recycled from the excess chitosan that followed down and were collected in the base plates when we were creating the cups. The following are some images for visual support:
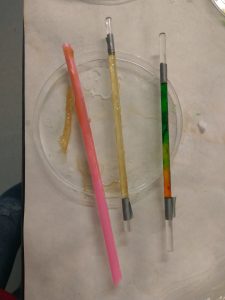
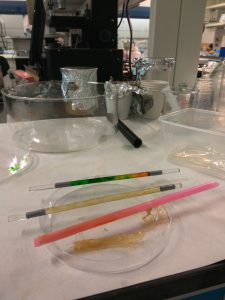
Images of processes of creating chitosan straws
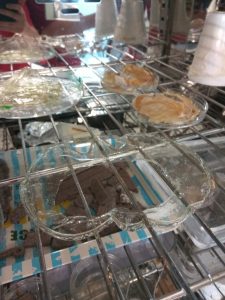
As we continue to work on our procedures, we were committed to looking out for more effective or efficient methods of producing the same, or better results. One example of this would be when to add the sodium hydroxide. Initially, we added it immediately after making the chitosan and pouring it into a layer. However, we noticed the chemical reaction between acid and base would be too quick, and the chitosan became clumpy and upon drying, very wrinkled and uneven. We then tried soaking the chitosan layer in sodium hydroxide after it was put into the cabinet for a few days. This produced a much more even layer, though the sheet eventually still wrinkled up quite a bit. We eventually tried using the sodium hydroxide to soften the chitosan sheet after it was kept in the cabinet for a while, and took advantage of the state of the softened sheet to roll it up over a straw. We then added some chitosan where the sheet was the be “glued” together, and put it into the cabinet.
If you compare the two containers in the image on the left below, you can visibly note the difference between the wrinkled up chitosan sheet (same image, right) which was soaked in sodium hydroxide and placed in the drying cabinet for a few days, and the one that does not have sodium hydroxide added yet (same image, left). The image below on the right shows the sheet being soaked in the sodium hydroxide before it was rolled up over the straw.
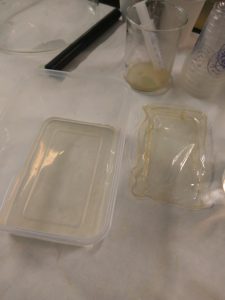
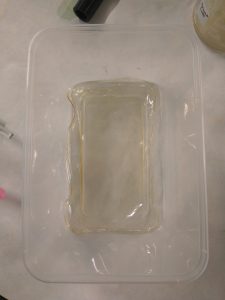
Images of comparing chitosan sheets of different states
As we continue to await the processing of the chitosan products and more progress on our side, we wrote this article and hope you enjoyed reading it.
Although we are far from producing a marketable product, we have learned some interesting lessons and wish to take you with us on our journey of progress. So if you are interested, keep a lookout for our posts as we promise to keep you updated on this blog every one to two weeks!
Keep slaying!
Written By:
Ng J-Cyn
Jaryl Lim
Sharmayne Lim
Jonathan Chong


 by 4 students researching on and experimenting with biological alternatives to plastic, or more specifically, chitosan and is led by Post-doctoral Researcher Sanandiya Nareshkumar (EPD) and Asst. Professor Javier Gomez Fernandez (EPD).)